Showing posts with label Halloween Crafts. Show all posts

Tuesday, October 7, 2014

Vintage Halloween Postcard Project Idea

 Vintage Halloween Postcard Project Idea

Create decor using Vintage Halloween postcards as inspiration - like the clever snake from this post card that Martha Stewart Living recreated. It's Sssssspooktacular!

Monday, October 6, 2014

Creating Your Vintage Hallowe'en - The Folklore, Traditions, and Some Craft Makes


Creating Your Vintage Hallowe'en - The Folklore, Traditions, and Some Craft Makes By Marion Paull can be ordered online at Barnes & Noble or at Amazon.com. It's published by CICO Books. I recently ordered it and found it quite charming. It's a small book--about 6 3/4" x 7 1/2" and about 1/2 inch thick--a hard cover with 144 pages. It's full of lots of great Vintage Halloween imagery--from old time postcards and other ephemera.

It also comes with a charming paper JOL ribbon bookmark inside. The contents include a history of Halloween, celebrations, symbols of Halloween, divine superstitions and then collectibles. 

The endpapers are a nice spooky scene of tons of flying witches and moons. There are some crafts, activities and recipes sprinkled through the book--including balloon ghosts, haunted house lanterns, cobweb tablecloth, grinning jack o' lantern, caramel apples, witch costume, and a pumpkin trick or treat bag (shown below).There's even a section on old-time Halloween pranks.

I wasn't expecting this, but was pleased to see that my website, Vintage Halloween, was listed with several others in the back on page 144 as a place to be "overwhelmed by gorgeous vintage Hallowe'en style."

Here are some sample pages from the Amazon.com listing:


Thursday, October 24, 2013

Countdown to Halloween - Oct. 24 - Carving Faux Pumpkins


Bruce sent me some photos of his pumpkin carving on faux pumpkins--from Funkins to those he has purchased at Michael's. The key he says to carving, is to use a hot knife as it will carve like slicing through butter! 


Jenn:)

Tuesday, October 22, 2013

Countdown to Halloween - Oct. 22 - Dennison Halloween Clip Art Sheet


Here's a fun sticker/decorations clip art sheet - use for creating seals, place cards, treat bag or favor embellishments, etc. Click here for the file. This is a Vintage Halloween Dennison image.

Jenn:)

Friday, October 18, 2013

Countdown to Halloween - Oct. 18 - Candy Corn - A Timeless Favorite


Love or hate it, it's Candy Corn-alicious! It isn't Fall until I've had my first Candy Corn. I love the stuff! It's always been a favorite around Halloween for me--and if you eat it with peanuts, it's like eating a Pay Day. Check out my Candy Corn Pinterest Board for crafts using candy corn and great recipe ideas some of which are shown throughout this posting.

Here's 5 interesting facts you may not know about Candy Corn:

1. George Renninger invented it in the 1880s.

2. The Goelitz Company (now Jelly Belly) has produced Candy Corn the longest.


3. Want some Chicken Feed? That's what Candy Corn was first called.....


4. National Candy Corn Day is Oct. 30.


5. At first, it wasn't just a Halloween candy--it was an anytime snack. It was only after WWII, that they started advertising it as a Halloween candy and it's been that way ever since.

Jenn:)

Thursday, October 17, 2013

Countdown to Halloween - Oct. 17 - Bruce's Halloween Lanterns


Collector and Lantern maker Bruce sent me some images of lanterns he recently made--they are Spooktacular! Here's his blurb about how he made these:

I’ve been making the same lanterns for over a decade and wanted to come up with something new. The motifs are from a set of Beistle diecuts from 1933; the JOLs atop the panels are made with a Martha Stewart craft punch and I put yellow vellum backing on them. The inserts are orange vellum.

Jenn:)

Sunday, October 13, 2013

Countdown to Halloween - Oct. 13 - Spooky Scarecrows


Spooky Scarecrow Project

Today I worked on craft project #3 for the annual Nancy Drew Halloween party - putting together 2 spooky scarecrows to put outside the front of the house - they will be really tall too--close to 7+ feet. I purchased 2 pumpkins that light up that have particularly spooky features and at night they look so neat all lit up! I took 2 x 2 boards and painted them black and have 2 black buckets to put these into with sand to keep them in place.

At JoAnn, I purchased some filmy black fabric to attach to the cross bar--which was just some garden stakes zip-tied onto the 2 x 2s.

I slit jagged cuts into the fabric to make it look tattered. With a little more fine tuning to go and setting them out later this week, they'll look great. I also have some crows to attach to the arms.


Jenn:)

Tuesday, October 8, 2013

Countdown to Halloween - Oct. 8 - Spooky Ghost Window Silhouettes


Ghostly Window Silhouettes

Another project I worked on today for my upcoming Halloween party was putting ghost silhouettes into the front 3 arch windows on one side of the house that's a studio. I was going to do my usual black window silhouettes backed with a yellow tissue and then immediately ruled that out--ghosts should be white I think, they're more effective that way, so I decided to cover the window with the black and cut out the ghosts and back the cutout area with the white tissue paper. I think this effect is much more spooky, after all I'm trying to "haunt" the house!

I had 3 windows and used 4 poster board sheets for these - One solid piece and then a part of one to make it taller. This is a very inexpensive project to do and has such a great effect. The poster board was .99 cents at Michaels and a little less with a discount I had on my total purchase and the white tissue I had on hand in the Christmas wrap drawers, but a package is generally around a dollar or more at most stores. 

I put the 2 pieces of poster board together and taped along the seam--I didn't worry about removing the sticker on the back since I kept that side as the backside which no one will see. Then, I drew on my ghosts with a pencil and then cut them out--I cut them out within the poster board, leaving borders all the way around to keep it one sturdy piece, then taped white tissue on the back, flipped it over and added some tape underneath various areas onto the tissue to stabilize it. Then I cut out features and taped those on. Luckily the windows were as wide as the poster board so I didn't have to trim up and down on those. Now I need to do several of the upstairs windows and the front window to go along with the theme. This was a method that was much quicker than my usual black silhouettes and then taping loads of tissue all over the window.

Here's how the windows turned out:


Jenn:)

Wednesday, September 25, 2013

Halloween Skeletal Wreath How To


My first Halloween Craft Project this year was to make a creepy yet elegant Skeletal Wreath for the door - both for decoration for Halloween and to go along with my annual Nancy Drew Halloween party. It was very simple and easy to do and I used supplies from Michael's to do it:

A wreath form, hot glue gun and glue sticks, some rolls of ribbon, and a bag of skeleton hands plus I added a glittered black crow to the ribbon hanger.


Begin by wrapping the wreath form with your ribbon and use a small dab of hot glue to keep it in place--at the beginning and several more times throughout the wrapping process and at the end.  I chose a ribbon about 1/2" wide in the Halloween section that is slightly transparent and edged with glittery fluff which looked really nice on the wreath form. The ribbon was in 3 yard rolls and I took 2 plus a tiny bit of a 3rd.


Once you have the wreath form covered, it's time to glue on the skeleton hands. I purchased 2 bags and used one and about half of the second bag. Each bag has 12 skeleton hands in it. 


Position the hands around and get a pattern you like - I matched up short finger ends and long finger ends to keep it in aligned visually all the way around.


Some hot glue on one side and press and hold for a few seconds to set. If you end up using too much glue and it bleeds out around the edges, which I had happen on some of mine, best to take some black paint and cover the glue once cooled so it blends in with the background and doesn't distract visually.


Once you have them all glued on, you can add a ribbon hanger. I had a small gap between the last 2 I glued where I added my ribbon hanger but felt it seemed too bare, so I added one more skeleton hand coming downward which I think gave it more character--see picture at top.

Jenn:)

Monday, August 26, 2013

Halloween Decorating Idea - Witchy Candle Holder


I loved the glass at Kirkland's above--but decided to not use it for wine and as a candle holder instead--got a 2nd one to go with it. Here it is all lit up:

 
Jenn:)

Monday, July 22, 2013

Halloween Charm and Bead Sets at The Vintage Halloween Store

We've got dozens of sets of extra beads and charms and fun items that can be used in crafting or making charms out of - so much so, we're sharing our extras with you! You can find a lot of these sets in The Vintage Halloween Store - good for scrapbooking or paper crafting too in addition to jewelry making!


Jenn:)

Tuesday, September 4, 2012

Tuesday, October 25, 2011

Oct. 25 - Day 25: Crafty Halloween Ideas #8

Crafty Halloween Ideas #8 -
Decoupage Pumpkins

I decided to do a crafty decoupage pumpkin for my Nancy Drew Halloween party. Part of my decor is black/white mostly so the multi pic endpapers from the Nancy Drew books worked perfectly. It's kind of got a Toile look to it. I think I'm going to paint the stem black tomorrow once it finishes drying overnight.

Materials:

I purchased all of these items at Michaels.

Faux pumpkins
Modge Podge
Foam Brush
Images

Instructions:

Set up your table with something the pumpkin (and you) won't stick to--I used plastic. Also, cut out your images first so you'll have them ready to go assembly line once you start. Tip: Take a bowl to set your pumpkin in to work on as this makes it easier to work with. I covered my bowl with some saran wrap to keep the modge podge off it. Another Tip: Have your images printed at the copy shop--so the ink won't bleed as it will on an ink jet printer. If you have some special spray then you can print your own and use the spray to keep the ink from running.

Begin placing your images on the pumpkin--I started out at the bottom and worked my way up. You can brush the pumpkin with modge podge and then place the image but I found it easier to paint it on the bottom of the paper and then apply. I also wore some painters gloves so I wouldn't have to spend half the night scraping modge podge off my hands.

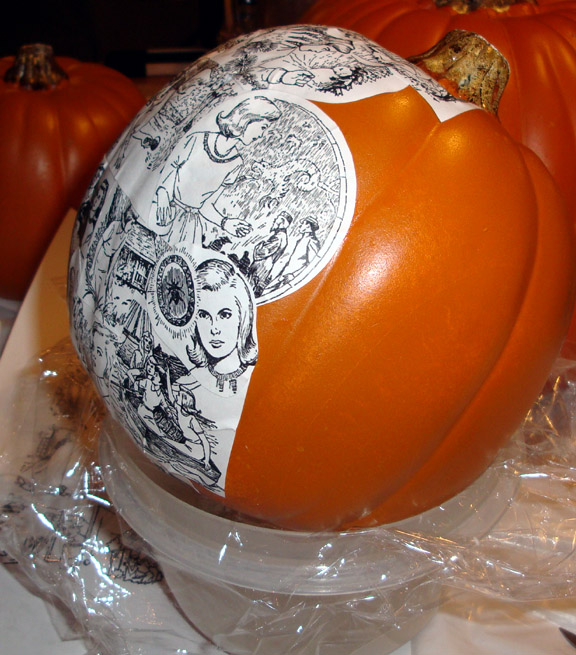
As you work it will go quickly. Sometimes you have to trim things certain ways to make it fit better--I find smaller pieces work better on surfaces like this that aren't flat.

Do about half the pumpkin at one time and then let it dry and then do the other side. I printed images for the earlier version of these endpapers with the 22 little scenes like the blue multi pic endpapers but didn't get a chance to start the second pumpkin.

It was a pretty easy project to do--you can't really mess up this kind of project! I completed mine while watching Dancing with the Stars and Castle with wait times for drying so it wasn't too time consuming.

Jenn:)

Monday, October 24, 2011

Oct. 24 - Day 24: Crafty Halloween Ideas #7

Crafty Halloween Ideas #7 -
Ghost in the Mirror

Mary Beth sent in this DIY idea and here's her instructions:

"This is one of my favorite crafty DIY projects. I've used it for years. It's very cheap and very easy to make but it has a really big WOW factor.

Take a piece of wax paper cut to fit a mirror or your choice.

Trace a floating ghostly figure with a pencil angled from one side, so that the other side keeps its original straight edge.

Trim out shape with scissors.

Crumple the ghostly figure in a ball and then carefully uncrumple.

Using double sided scotch tape, adhere the ghostly figure to a mirror, using the straight edge as your guide.

Once adhered, add 3 black cardstock circles/ovals for the eyes and mouth.

Easy Peasy! Now you have a perfect ghost in the mirror.

I always put my ghost in my powder room because no one expects a ghost to be hiding out in the powder room!"

Jenn:)

Sunday, October 23, 2011

Oct. 23 - Day 23: Crafty Halloween Ideas #6

Crafty Halloween Ideas #6 -
Window Silhouettes

Part of any great Halloween celebration is setting the scene! One neat way to do so, is to create a window silhouette. Choose a window that has a great focal point to your house and the party. A front window that isn't obstructed from view from the street is ideal too, so everyone walking and driving by can see how spiffy you are ;) Ha!

I have been doing these for quite a few years now. I've had various themes before--witches, pirates, The Great Pumpkin/Snoopy, Sleepy Hollow/Headless Horseman, and the last several years I've been doing a Nancy Drew Mystery Halloween Party--as is my theme for this year which also includes a haunted house so it works well for Halloween. The above silhouette is my front window for this year and a take off on The Hidden Staircase book and I added a ghost to the side behind Nancy Drew.

Materials:

Silhouette Image
Black Poster Board
Tape
Scissors
Pencil
Tissue Paper

Instructions:

The first thing to do is figure out your design for the window and print it out to use as a guide. I printed mine out, divided it into 4 parts for the 4 areas of my window.

I then taped up my 4 pieces of black poster board into the window and then I used my printed silhouette image as a guide while I drew the outline onto the poster board in pencil.

Keep proportion in mind when doing this! If you happen to have a projector--projecting the silhouette onto a wall where you've taped your paper is much easier and goes quicker. What I do is old school since I don't have a handy projector.

Once you have the desired look, cut out the pieces. Begin taping your silhouette into the window--I try not to use too much tape and tape in areas where it won't show too much like on the backs of strips that are going across the panes, etc.

The key is to layer the tissue and not overlap too much as overlapping shows up darker. Piecing with tissue can be time consuming but it's worth it.

If you want to make a silhouette that you can use again and again without too much wear, you can make it out of felt. I have a red felt banner with black felt silhouette and in a window it glows nicely. If you used yellow or white and then a black silhouette on it, it will look great too and keep nicely.

If you have a lot of time on your hands, fill all your front facing windows with silhouettes for a complete look.

Jenn:)