 Here are some neat Halloween jewelry pieces you can find at Etsy! The above pendant is from LDphotography.
 Necklace from SihayaDesigns
 Earrings from obsessedwithvintage
 Owl necklace from AutumnBearStudios
 Charm from fairylandbeads
Jenn:)

Vintage Halloween Collectors & Enthusiasts: Here You'll Find Collecting Vintage Halloween, Vintage & Vintage Style Crafts & Projects,Vintage and Vintage Style Halloween Merchandise and Party Planning and Many More Bewitching Things!
Here are some neat Halloween jewelry pieces you can find at Etsy! The above pendant is from LDphotography.Necklace from SihayaDesignsEarrings from obsessedwithvintageOwl necklace from AutumnBearStudiosCharm from fairylandbeads Crafty Halloween Ideas #7 -
 Vintage Halloween Collectibles at eBay
 This old banjo sold for $871.00.
 Check this one out! It's an old Beistle Witch Centerpiece. It sold for $810.00!
 Crafty Halloween Ideas #6 -
 I then taped up my 4 pieces of black poster board into the window and then I used my printed silhouette image as a guide while I drew the outline onto the poster board in pencil.
 Keep proportion in mind when doing this! If you happen to have a projector--projecting the silhouette onto a wall where you've taped your paper is much easier and goes quicker. What I do is old school since I don't have a handy projector.
 Once you have the desired look, cut out the pieces. Begin taping your silhouette into the window--I try not to use too much tape and tape in areas where it won't show too much like on the backs of strips that are going across the panes, etc.
 The key is to layer the tissue and not overlap too much as overlapping shows up darker. Piecing with tissue can be time consuming but it's worth it.
 Week 4 Prize
 Week 3 Blog Party Winner...
 Vintage Halloween Collectibles


 If you'd like to share your decor and collectibles, send photos to: webmaster@vintagehalloween.com.
 Anyone up for Cat Bowling?
 Vintage Halloween Plastic Collectibles
 Sold for: $238.00
 Sold for: $301.88
 Sold for $330.00
 Sold for $177.77
 Vintage Halloween Collectibles Display
 Vintage Halloween Tally Cards

 I love the imagery on these.
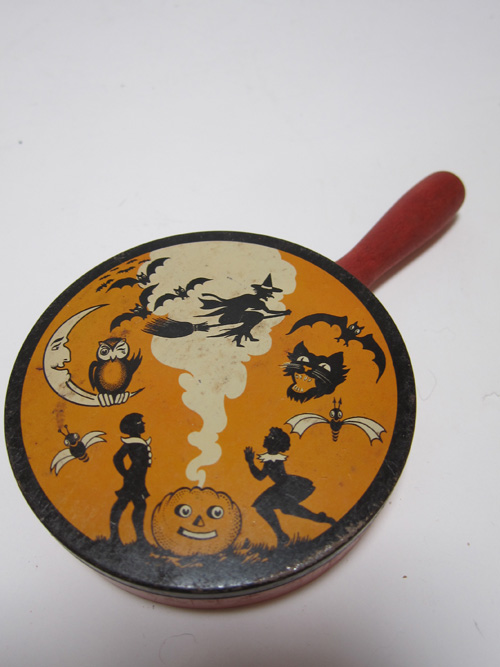 Here's a neat Halloween Noisemaker I spotted this year--I ike the graphics which are a hodge podge of imagery, but work well together!
 Crafty Halloween Ideas #5 -
 Vintage Halloween Collectibles: The Beistle Lantern
 Sale! We've put quite a few of our Martha Stewart Halloween items on sale in the Vintage Halloween Store--check them out! Other items throughout the store on sale as well. Order by Tues. Oct. 25 to ensure timely delivery by Halloween. Our Express mail cutoff is Thurs. Oct. 27.
 Jenn:)
 Crafty Halloween Ideas #4 -
 1. Spray paint the wreath on newspaper with the spray paint coating liberally. Let dry.
 2. Set the wreath on a table and begin to add your embellishments--add the floral picks first and use your hot glue gun to adhere them to the wreath.
 Halloween Floral Picks
 Spooky Embellishments
 3. Arrange your embellishments around the wreath to get your desired design and then using your glue gun, attach them to the wreath.
 4. Once you're finished, you can create a hanger using wire or ribbon or if the grapevine wreath is sturdy enough, you can just hook it over your hook.
 The skulls came from a Martha Stewart Crafts kit of skulls that you could decorate or glitter. I decided to leave them plain so they'd look more like real skulls to liven up the black and dark colors of the floral picks. The floral picks, ravens, and glittered skeletons were all back in a Halloween display by the floral department. If you do not have a glue gun, they are very inexpensive or you can use wire, fishing line, or ribbon to attach things to the wreath--though the glue gun works better.


